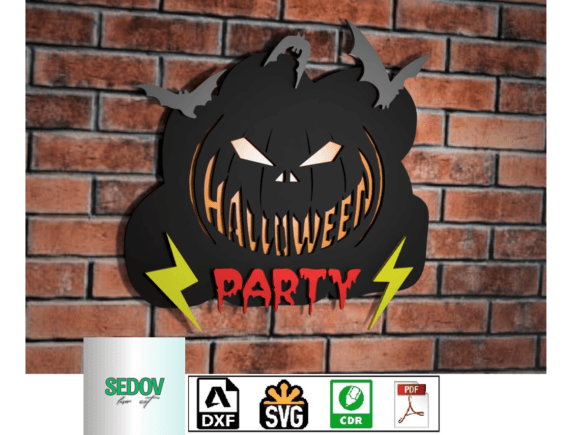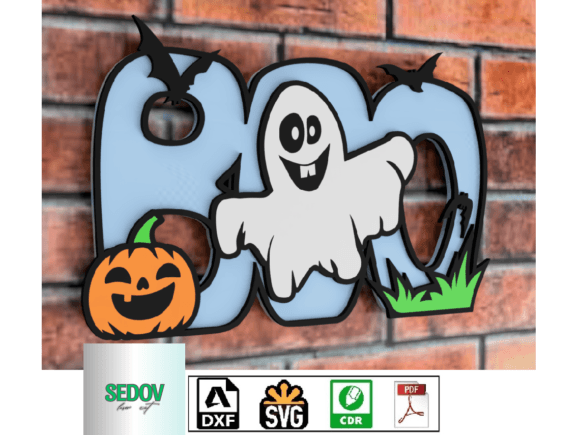
Laser Cut Sign BOO 3D Door or Wall Sign
Halloween decor has evolved significantly over the past decade. Gone are the days when a single plastic spiderweb taped to a doorframe constituted sufficient seasonal decoration. Today, homeowners and small business owners alike seek pieces that offer depth, texture, and a cohesive aesthetic. This is where the Laser Cut Sign BOO 3D Door or Wall Sign enters the conversation. It represents a shift from mass-produced, flat vinyl decals to layered, dimensional art that interacts with light and shadow in dynamic ways.
This specific template features a playful ghost, a grinning pumpkin, fluttering bats, and bold lettering spelling out "BOO." While the design itself is charming and festive, the true value lies in its versatility as a DIY project. Whether you are a seasoned woodworker or a beginner holding a glue gun for the first time, this file set offers a manageable yet impressive result. However, success depends less on the design file and more on the execution. Many creators rush into cutting without considering material thickness, structural integrity, or mounting logistics, leading to signs that sag, warp, or fail to hold together. Let’s explore how to navigate these pitfalls and create a sign that looks professional and lasts beyond the holiday season.
Understanding the File Formats and Material Choices
The product includes a zip file containing SVG, DXF, CDR, and PDF formats. This variety is crucial because it accommodates different software ecosystems and machine capabilities. If you are using a Cricut or Silhouette, the SVG is your primary asset. For those working with larger laser cutters like CO2 machines, the DXF or CDR files provide the precision needed for vector-based cutting. The PDF serves as a reliable fallback for manual tracing or printing reference guides.
One of the most significant advantages of this template is the note regarding material thickness: any thickness. This sounds liberating, but it requires careful planning. A common mistake is assuming that standard 3mm basswood will behave the same way as 6mm MDF or acrylic. Thicker materials allow for deeper layering, which enhances the 3D effect of the ghost and pumpkin. However, thicker stock also increases weight. If you plan to hang this sign on a drywall surface without finding a stud, heavy materials may cause the mounting hardware to pull away over time. Conversely, very thin materials (under 2mm) may lack the rigidity to support the intricate bat wings, causing them to bend or break during handling.
For beginners, we recommend starting with 4mm birch plywood or MDF. These materials are stable, easy to paint, and provide enough substance for the layers to sit securely against one another without being overly burdensome to mount.
The Critical Importance of Structural Integrity
The instructions explicitly state that all parts of the sign must be glued or secured in some way. This is not merely a suggestion; it is a mechanical necessity. Laser-cut pieces rely on friction fits or adhesive bonds to maintain their spatial relationship. A frequent error among novice crafters is relying solely on the tightness of the cut to keep layers aligned. In reality, thermal expansion, humidity changes, and simple gravity can cause unsecured joints to separate.
When assembling the Laser Cut Sign BOO 3D Door or Wall Sign, consider the following structural advice:
- Use the Right Adhesive: Standard white school glue often takes too long to dry and can warp thin wood. A quick-setting cyanoacrylate (CA glue) or a strong construction adhesive works better for immediate bonding. For porous materials like MDF, a PVA wood glue applied sparingly ensures a strong bond without excessive squeeze-out.
- Test Fit Before Gluing: Never apply glue until you have dry-fitted every component. Check that the ghost’s arms align with the body and that the pumpkin stem sits flush. Adjustments made after gluing are difficult and often messy.
- Reinforce Weak Points: The bat wings are delicate. Consider adding a tiny drop of glue at the wing base and where they connect to the main frame. If the design allows, ensure there are sufficient contact points between the background layer and the foreground elements.
Neglecting these steps results in a sign that looks disjointed or falls apart within weeks. Proper adhesion transforms individual cutouts into a unified piece of art.
Painting and Finishing Techniques
You have the freedom to paint the finished product in any color. This customization is where the sign truly becomes unique. However, painting layered wood introduces its own set of challenges. One common issue is paint bleeding under masks or onto adjacent layers if the pieces are not fully separated before painting. To avoid this, paint each layer individually while they are still loose, then assemble.
Another consideration is the finish. Raw wood absorbs paint unevenly, leading to a patchy appearance. Applying a primer or a coat of gesso before your final colors ensures a smooth, vibrant finish. For the classic Halloween look, a matte black background with white ghosts and orange pumpkins creates high contrast. For a more modern vibe, try pastel tones or metallic gold accents on the bat wings. Remember that the choice of paint affects the weight slightly; thick acrylics can add bulk to thin edges, so apply thin, even coats rather than heavy dabs.
Mounting and Display Logistics
The template specifies that fasteners are at your discretion, which places the responsibility squarely on the creator. Because the sign measures approximately 425 mm by 270 mm (16.7 in x 10.6 in), it has a substantial surface area. Hanging such a piece requires more than just a single nail in the center, especially if the sign is deep due to multiple layers.
If hanging on a wall, use a French cleat system or two D-rings connected by wire. This distributes the weight evenly and prevents the sign from tilting forward. The depth of the 3D layers means the sign will protrude from the wall, so ensure there is adequate clearance for light fixtures or traffic flow. If displaying on a shelf, ensure the base layer is flat and stable. You might add felt pads to the bottom corners to prevent scratching the shelf surface.
A practical tip for renters or those who cannot drill holes: use high-quality removable adhesive strips rated for the weight of your chosen material. Test the weight of your assembled sign before committing to a permanent installation method.
Why This Template Stands Out
In a market saturated with generic clipart, the Laser Cut Sign BOO 3D Door or Wall Sign offers a balanced mix of complexity and manageability. The design elements—the ghost, pumpkin, and bats—are iconic but rendered with enough detail to justify the laser cutting process. It is not so complex that it becomes frustrating to assemble, nor so simple that it feels cheap.
Furthermore, the inclusion of multiple file formats makes it accessible to a wider audience. Whether you are a blogger looking for content creation props, a small business owner wanting custom signage for a Halloween event, or a parent engaging in a weekend craft project with children, this template adapts to your needs. The ability to customize colors and materials means it can fit seamlessly into existing home decor themes, whether rustic, modern, or traditional.
Final Thoughts on Execution
Creating a successful 3D laser-cut sign is about patience and attention to detail. Take your time with the assembly. Ensure every joint is secure, every edge is sanded smooth if necessary, and every paint stroke is deliberate. By avoiding common mistakes related to material selection, adhesion, and mounting, you can produce a result that exceeds expectations. This sign is more than just seasonal decoration; it is a testament to the joy of making something tangible and beautiful with your own hands. Embrace the process, experiment with colors, and enjoy the boo-tiful charm it brings to your space.